


Wondering which plush toy decoration method costs the most? Embroidery usually tops the list, while printing often comes in as the most budget-friendly. Take a look at the typical cost breakdown:
Decoration Method | Setup Cost Range | Unit Cost Premium | Typical MOQ |
|---|---|---|---|
Embroidery | $50–$200 per design | +15–40% over printing | 300–500 units |
Printing (Digital) | $0–$80 | Lower baseline; rises with color count | 12–200 units |
Printing (Screen) | $30–$150 | Lower baseline; rises with color count | 200+ units |
Keep in mind, plush toy embroidery custom costs shift based on a few things:
Material selection matters—luxury fabrics drive up prices.
Size and complexity impact labor and materials.
Key Takeaways
Embroidery is the most expensive method for plush toy decoration, ideal for high-quality, durable designs.
Printing is the most budget-friendly option, perfect for colorful and detailed designs, especially in large orders.
Heat-transfer offers a middle ground, suitable for bold patterns but may not be cost-effective for small batches.
Decoration Cost Overview
Most and Least Expensive Methods
Let’s get straight to the point. Embroidery usually costs the most when you decorate plush toys. This method uses thread and stitching machines to create designs right on the fabric. It takes more time and skill, so the price goes up. You’ll often see embroidery on high-end or collectible plush toys.
Printing, especially digital printing, is the most affordable option for most projects. It works well for colorful or detailed designs. You can print small batches without spending a lot on setup. Screen printing can also be budget-friendly, but the cost rises if you want lots of colors.
Heat-transfer sits in the middle. It’s not as pricey as embroidery, but it can cost more than printing if you only need a few plush toys. This method works best for large, bold patterns.
Tip: If you want something durable and long-lasting, embroidery is worth the extra cost. For giveaways or short-term promotions, printing or heat-transfer can save you money.
Key Cost Factors
Several things can change how much you’ll pay for plush toy decoration. Here’s a quick look at what matters most:
Factor | Description |
|---|---|
Intricate designs favor printing, while simpler designs are better suited for embroidery. | |
Budget | Printing is generally cheaper than embroidery, especially for large orders. |
Intended Use | Embroidery is more durable for long-term use, while printing is cost-effective for temporary items. |
Design Complexity: Simple logos or shapes cost less to embroider. If your design has lots of tiny details or many colors, printing is usually the smarter choice.
Budget: If you need to keep costs low, printing is your friend. Embroidery adds a premium, especially for small orders.
Intended Use: Plush toys for kids or collectors need to last. Embroidery stands up to washing and play. For event giveaways or short-term use, printing or heat-transfer works just fine.
Every project is different. Think about your design, how many plush toys you need, and how they’ll be used. This will help you pick the best decoration method for your budget and needs.
Plush Toy Embroidery Custom Costs
How Embroidery Works
Embroidery for plush toys uses advanced machines to stitch designs directly onto the fabric. This process is different from regular textile embroidery. Plush toy embroidery custom techniques often use computer-controlled machines for precise details. Sometimes, appliqué embroidery adds extra fabric pieces for a 3D effect. Here’s a quick look at the main techniques:
Technique | Description |
|---|---|
Computer Embroidery | Utilizes computerized machines for precise and detailed stitching, allowing for complex designs. |
Appliqué Embroidery | Combines fabric pieces with embroidery to create a textured, three-dimensional look on plush toys. |
Embroidery Cost Breakdown
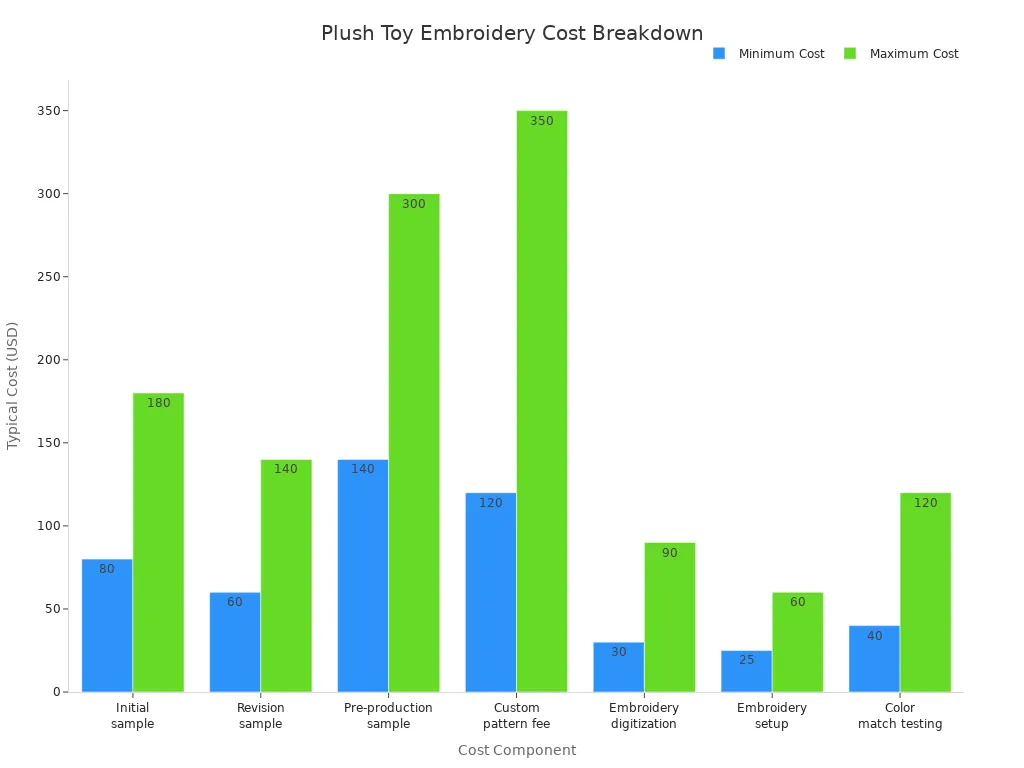
Plush toy embroidery custom costs include several parts. You’ll pay for setup, digitization, and each unit. Setup costs are higher than other methods, usually $50–$200 per design. Per-unit costs depend on order size and design complexity. Simple embroidery can cost $0.04–$0.08 per piece, while detailed work can reach $0.20 or more. Here’s a breakdown:
Cost Component | Typical 2026 USD | Description |
|---|---|---|
Initial sample (1st version) | $80 – $180 | Pattern draft, cut, sew, fill, finish one piece |
Revision sample | $60 – $140 | Each design revision before approval |
Pre-production sample (PPS) | $140 – $300 | Final sample with production materials |
Custom pattern fee | $120 – $350 | Industrial pattern from concept art |
Embroidery digitization | $30 – $90 per design | Converts vector to embroidery file |
Embroidery setup (per SKU) | $25 – $60 | Machine setup and thread color matching |
Color match testing | $40 – $120 | Fabric dye lot match to brand color |
When to Choose Embroidery
Choose plush toy embroidery custom decoration when you want high quality and durability. Embroidery lasts longer than print or heat-transfer. The thread becomes part of the toy, so it resists fading and flaking, even after many washes. This method works best for high-end, collectible, or corporate plush toys. If you need a premium look and your design is simple or bold, embroidery is worth the investment.
Note: Plush toy embroidery custom is not the cheapest option, but it gives your plush toys a professional and lasting finish.
Print Method Costs
How Printing Works
Printing on plush toys uses advanced machines that can handle soft, fuzzy fabrics. These machines use special technology to make sure designs look sharp and colorful. Here’s a quick look at the main features you’ll find in modern plush toy printing:
Technology | Description |
|---|---|
White Ink Circulation System | Keeps ink flowing smoothly and prevents clogging, so colors stay bright and machines last longer. |
Dual Epson Printing Heads | Mixes colors with high accuracy and works fast for big orders. |
Strong Hardware Support System | Makes sure every print is stable and precise, even on tricky fabrics. |
Holistic Steel Printing Platform | Gives a tough, flat surface for printing on all kinds of plush materials. |
Movable Screw Coupling Structure | Lets workers fix problems quickly and keeps production moving. |
Intuitive Interface | Easy controls and real-time updates help workers get great results every time. |
Print Cost Breakdown
Printing costs for plush toys are pretty straightforward. Here’s what you need to know:
Setup costs are mostly fixed, no matter how many toys you print.
The price per toy drops a lot when you order more.
Complex designs with lots of colors can raise the setup fee, but simple prints stay affordable.
Printing is usually cheaper than embroidery, especially for large or colorful designs.
Tip: If you want a lot of plush toys with a bright or detailed design, printing gives you the best value.
When to Choose Print
Printing is a smart choice for many plush toy projects. Here’s why:
You get high-precision pattern reproduction. Printing handles tiny details and complex graphics with ease.
The production cycle is short, and costs stay low. This is perfect if you need a big batch fast.
Printed designs keep the plush toy soft and cuddly. There’s no stiff patch or extra layer.
If your design is colorful, detailed, or you need a quick turnaround, printing is the way to go. It’s also the most cost-effective method for simple logos or large orders.
Heat-Transfer Costs
How Heat-Transfer Works
Heat-transfer decoration uses heat and pressure to apply a printed design onto the plush toy’s fabric. The process starts with printing your design on special transfer paper. Workers then use a heat press to bond the design to the plush surface. This method works best on short-pile plush, where the fabric is smooth and flat. You get a clean, even finish that can show off bright colors and complex gradients.
Heat-Transfer Cost Breakdown
Heat-transfer has higher equipment and material costs than basic printing. The machines and special transfer sheets add to the price, especially for small orders. For large runs, the cost per plush toy drops. Labor is the main expense, but it stays lower than embroidery. If you want a big, colorful logo on 500 plush toys, expect to pay between $0.05 and $0.25 per piece. Large-area patterns cost more, but heat-transfer is still more affordable than embroidery for these designs.
Here’s a quick look at the main cost factors:
Cost Factor | Description |
|---|---|
Production Costs | Printing is significantly cheaper than embroidery for large-area designs. |
Print Area Size | Larger print areas increase costs, but still remain economical. |
Design Complexity | Intricate designs raise printing costs. |
Order Quantity | Larger orders lower the per-unit cost, making it more cost-effective. |
Example Cost | Printing a logo on 500 units costs between $0.05–$0.25 per piece. |
Main Expense | Labor is the primary cost in producing plush print toys. |
Tip: Heat-transfer is not the best choice for tiny batches. The setup costs make small runs expensive.
When to Choose Heat-Transfer
Heat-transfer shines when you need to decorate a large area or want a design with lots of color and detail. It handles complex gradients and logos that embroidery can’t match. The finish feels smooth on short-pile plush, but it may crack or peel if the adhesive fails.
Method | Best Use Case | Durability & Feel | Limitations |
|---|---|---|---|
Heat Transfer | Smooth finish on short pile. | Cracks or peels if adhesive fails. |
If you want bold, eye-catching designs on a big batch of plush toys, heat-transfer is a smart pick.
Side-by-Side Cost Comparison
Setup and Per-Unit Costs
Let’s break down what you really pay for when decorating plush toys. Each method—embroidery, printing, and heat-transfer—has its own cost drivers. Some costs hit you up front, while others show up with every plush toy you make.
Main cost drivers for each method:
Embroidery: High setup fees, especially for new or complex designs. Each plush toy costs more because of the time and skill needed. The more detailed the design, the higher the price.
Printing: Lower setup costs, especially for digital printing. Per-unit costs drop fast as you order more. Complex designs don’t add much to the price.
Heat-Transfer: Equipment and materials cost more at the start. Per-unit costs sit between embroidery and printing. Large, colorful designs are affordable, but small orders can get pricey.
Here’s a quick table to help you compare:
Method | Setup Cost (per design) | Per-Unit Cost (simple) | Per-Unit Cost (complex) | Notes |
|---|---|---|---|---|
Embroidery | $50–$200 | $0.04–$0.08 | $0.20+ | Best for durability, higher for detail |
Printing | $0–$80 (digital) | Low | Slightly higher | Great for color, low for big orders |
Heat-Transfer | $80–$200 | $0.05–$0.25 | $0.25+ | Good for large, bold designs |
Note: Embroidery stands out for plush toy embroidery custom projects that need a premium, long-lasting finish. Printing and heat-transfer work best for colorful or detailed designs on a budget.
Impact of Order Size and Design
Order size and design complexity can change your costs in a big way. Let’s see how these two factors play out.
Order Size
Ordering more plush toys almost always means you pay less per toy. Here’s why:
Factories spread the setup costs over more units.
They buy materials in bulk, which lowers prices.
Production lines run smoother, so there’s less waste.
Check out this table for a quick look:
Order Size | Cost Per Unit | Cost Drivers |
|---|---|---|
500 units | Higher | Setup costs not spread out |
5,000 units | Lower | Setup costs shared, bulk discounts kick in |
10,000 units | Lowest | Big savings from scale and less material waste |
Larger orders lead to lower costs per unit because:
Factories can split setup costs across more toys.
Suppliers offer discounts for buying lots of fabric and thread.
Design Complexity
The design you choose also affects your price tag. Here’s how each method handles complex designs:
Method | |
|---|---|
Embroidery | More expensive for intricate designs due to detail costs |
Printing | Usually stays affordable, even for complex graphics |
Heat-Transfer | Handles detail well, but quality can vary with complexity |
Embroidery gets pricey fast if your design has lots of tiny details or many colors.
Printing is the best bet for complex or colorful designs. The cost doesn’t jump much, even if your design is wild.
Heat-transfer works well for detailed logos or gradients, but the finish might not feel as high-end as embroidery.
In the end, think about how many plush toys you need and how fancy your design is. That’s the best way to pick the right decoration method for your project.
Cost vs Durability and Appearance
Durability by Method
Durability matters a lot when you pick a decoration method for plush toys. Embroidery stands out for strength. The thread becomes part of the toy, so it resists fading, peeling, and washing. Printed designs look sharp and colorful, but they can fade after many washes or rough play. Heat-transfer decorations hold up well at first, but the design might crack or peel if the toy gets squeezed or washed often. If you want a plush toy that lasts for years, embroidery is your best bet.
Tip: For toys that will see a lot of hugs and play, choose embroidery for the longest life.
Appearance and Design Limits
Each decoration method has its own look and limits. Embroidery gives a classic, textured finish, but it can’t handle tiny details or smooth color fades. Printing and heat-transfer can show off bright colors and complex patterns, but they may not feel as premium. Here’s a quick comparison:
Method | Appearance Limits | Design Limits |
|---|---|---|
Embroidery | 2–12 colors; no smooth gradients; hard edges on color blocks | Small details under 3mm lose definition; large areas can distort fabric |
Sublimation | Only works on white/light polyester; colors fade on darks | Not for natural fibers or textured fabrics |
Appliqué | No photographic detail; small pieces are tricky | Large pieces can wrinkle; not for budget plush |
So, if your design has lots of colors or tiny details, printing or heat-transfer works better. Embroidery shines for bold, simple logos.
Best Use Cases
Wondering which method fits your plush toy project? Here are some top picks:
Stuffed Animals: Great for kids’ toys—soft and comforting.
Character Plushies: Perfect for collectors and fans.
Customizable Plush Toys: Awesome for corporate gifts and branding.
Baby Plush Toys: Safe and gentle for infants.
Seasonal Plush Toys: Fun for holiday promotions and gifts.
Every method has a sweet spot. Embroidery is best for keepsakes and premium gifts. Printing and heat-transfer are perfect for colorful, trendy, or promotional plush toys.
Choosing the Right Method
Decision Framework
Picking the right decoration method for your plush toys can feel tricky. Let’s break it down so you can make a smart choice. Start by asking yourself a few questions:
How many plush toys do you need?
Is your design simple or complex?
Do you want your toys to last for years, or just for a short event?
What’s your budget?
If you need a premium look and durability, plush toy embroidery custom is a solid option. It works best for simple designs and high-end gifts. Printing is great for colorful, detailed artwork and large orders. Heat-transfer fits bold patterns and big logos, especially when you want lots of color.
Here’s a quick table to help you decide:
Method | Best For | Not Ideal For |
|---|---|---|
Embroidery | Simple, durable, premium toys | Tiny details, low budgets |
Printing | Complex, colorful, big batches | Super-premium, textured look |
Heat-Transfer | Large, bold, colorful designs | Small runs, rough play |
Tip: Think about your project goals and match them to the method that fits best.
Cost-Saving Tips
Want to save money on plush toy decoration? Try these strategies:
Package several plush toys in one bag. This lowers shipping costs and keeps smaller toys safe.
Choose overseas manufacturing for large orders. Factories abroad offer competitive prices for big batches.
Dropshipping works well for startups. You can test new designs without spending much upfront.
Hybrid approaches let you mix methods. This gives you control and flexibility as your brand grows.
Here’s a handy table for quick reference:
Strategy | Description | Best For |
|---|---|---|
Overseas Manufacturing | Great for big orders at lower prices | Large-scale production |
Dropshipping | Low startup costs, easy to test new designs | Startups, small businesses |
Hybrid Approaches | Mix methods for cost and customization | Brands needing flexibility |
🧸 Tip: If you have a tight budget but need lots of plush toys, packaging and overseas production can help you save.
Embroidery costs the most, while printing is the most affordable. Your best choice depends on your project. Check this table:
Factor | Influence on Decoration Method |
|---|---|
Order Size | Bulk orders optimize production and lower costs. |
Design Complexity | Simple designs save money. Intricate ones cost more. |
Durability Requirements | Premium materials boost durability and value. |
Use these tips to pick the right method for your plush toys!
FAQ
How do I pick the best decoration method for my plush toy?
Think about your budget, design, and how long you want the toy to last. Embroidery works for durability. Printing is great for color and detail.
Is embroidery always more expensive than printing?
Usually, yes. Embroidery costs more because it takes extra time and skill. Printing stays cheaper, especially for big orders or colorful designs.
What’s the minimum order for each method?
Here’s a quick look:
Method | Typical MOQ |
|---|---|
Embroidery | 300–500 units |
Printing | 12–200 units |
Heat-Transfer | 100–300 units |
